Thursday, December 27, 2012

How to get Windows Media Center in Windows 8

Microsoft’s response to those who bemoan Media Center’s loss is that no one is using it. They cite a statistic picked up by the software that states only 6% of users ever launch it. However, it appears that that 6% are very fond of the program, despite the presence of many other free programs for maintaining a digital library, such as VLC and Media Player Classic. Originally, Windows was going to drop the program entirely, but, in the face of vocal opposition, have softened their stance. While they still aren’t packing it with Windows 8, they’re making it easier for fans to get it.


How to Get Media Center on Windows 8 Pro
Windows Media Center is available for those who bought a copy of Windows 8 Pro via Microsoft until February 2013, A great offer for all Pro users. What are you waiting for...? Head over to Microsoft and download your copy of windows media center.

Else follow this steps to get your copy
-Visit the windows website here
-Scroll down and you will find a box where you can enter your e-mail to receive a free Windows Media Center package for Windows 8 Pro.


How to Get Media Center On Regular Windows 8 Version

If you didn’t purchase the pro-version of Windows 8, but you still want Media Center, you have two options:

a) you can get the Pro Pack upgrade, for $69.99, which will also get you the ability to log in remotely to your PC, and switch between languages and keyboard configurations with no sweat.
If those features sound appealing, the upgrade pack may be the way to go, but for other regular Windows 8 users.

b) Or for anyone who wasn’t looking to spend quite that much, Windows Media Center is available by itself for $9.99.


Saturday, December 15, 2012

Get iOS 6 on older versions of iDevices

One thing you can’t blame Apple for is dropping software support for their devices too quickly. Newer iDevices have been coming out thick and fast lately, but official iOS support for last two or three generations of devices isn’t too bad in many people’s book. If you have an older iPhone or iPod Touch that got ditched by Apple, then i've got good news for you.

Introducing Whited00r, the biggest community about iOS modding and firmware cooking in the world.
Whited00r provides modded Software Update for your older iDevices. it is the best solution for your Apple device, both for power and inexperienced users.

Whited00r will automatically jailbreak your device, and the installs the latest version of Cydia on it. The biggest advantage of the tool, is that you will get true multitasking, and apps will keep in running state in the background.

Here is a list of all the devices that are compatible with the latest version of Whited00r.

  • iPhone 2G
  • iPhone 3G
  • iPod touch 1G
  • iPod touch 2G

Disclaimer: Please follow this guide at your own risk. We are not responsible if your device gets damaged or bricked during the process.

Here is how you can get iOS 6 on your older iDevice.


Backup your Data
The installation process is safe and tested, but you are doing this at your own risk. For this reason we suggest that you backup your data and transfer your applications from the device back to iTunes on your computer by following these simple steps: 
Right click on your device name in iTunes, select "Backup" and then "Transfer Purchases".

Download the firmware
Download the right firmware for your device.

iPhone 2G

iPhone 3G

iPod touch 1G

iPod touch 2G

Installation
Open iTunes, click on restore holding ALT (On MacOS) or SHIFT (On Windows) at the same time and select the whited00r Software Update (.ipsw) from you computer.
installation could take up to 15 minutes, your device might restart a few times during the process.

Setting Up Your Device
Set up your device and enjoy the new features of iOS 6.

Enjoy!!!

Google Releases its Maps App for the iPhone

Google has released its Maps application for the iPhone.


Back in June, Apple unveiled iOS 6 with much fan fair: the release included great long-expected additions, which included the big surprise of ditching Google Maps for Apple’s own system. While great additions were brought to the table, Maps in sixth generation iOS has had its own share of post-launch issues and inaccuracies (for London users, as an example, all of the Underground stations magically disappeared from an iOS version to another). Google has seized this opportunity to bring back its Maps to the iPhone, this time as a standalone map. Overall, we think you should give it a look.


Description
Navigate your world with Google Maps, now available for iPhone. Get comprehensive, accurate and easy-to-use maps with built-in Google local search, voice guided turn-by-turn navigation, public transit directions, Street View and more. Use Google Maps to discover great places to eat, drink, shop and play, with ratings and reviews from people you trust. Sign in to save your favorite places and quickly access all your past searches and directions from your computer, right on your phone.


Search
* Find addresses, places and businesses around the world with Google local search.
* Discover places to eat, drink, shop and play, with ratings and local reviews.
* Sign in to sync your searches, directions, and favorite places between your computer and your phone.

Directions
* Get voice guided, turn-by-turn driving directions.
* Find your way by train, bus, subway or walking directions.
* Access live traffic information in cities across the world.

Street View and imagery
* View 360-degree panoramas of places around the globe with Street View.
* See inside more than 100,000 businesses worldwide.
* View high resolution satellite imagery of locations around the world.

Simple and easy to use
* An entirely new Google Maps experience on your iPhone.
* Newly designed and streamlined interface for even easier navigation of your world.
* Use gestures to explore the map and browse results.

You can download Google Maps from the App Store for free.

Tuesday, December 11, 2012

iPhone 5 Jailbreak is here

iOS 6 users have been waiting for an untethered jailbreak for some time now, but it seems that there’s finally a set date for it. A hacker by the name of “Dream JB” has announced that he’ll be releasing an untethered jailbreak for iOS 6.0.1 on December 22, and it will be compatible with newer iOS devices like the iPhone 5, iPad mini, the 4th-gen iPad, and the new iPod Touch.


However, what’s mysterious about this whole thing is that the jailbreak won’t come from the iPhone-Dev Team, which has been the go-to hacker team for iOS jailbreaks in the past. Instead, it comes from this new guy, Dream JB.

if you are skeptical about this, Dream JB has promised that he’ll post up a video proving that the untethered iOS 6 jailbreak is real. “the video will be a single-take shot of the entire jailbreak process, including a restart and usage of the device to prove it is untethered.” - Dream JB

You can follow DreamJB on his twitter page for any questions. 

Follow TheGeeTeam on twitter for more updates on this jailbreak or tweet InnoCentGee for any comments.


Twitter Announces Photo Filter Feature

Twitter has announced new photo features for its service that lets you edit, filter, and refine your images. From today you’ll be able to edit and refine your photos, right from Twitter. The latest versions for iPhone and Android introduce a few new ways to enhance the images you tweet.


Apply one of eight filters, ranging from black & white to vintage, to add a new look and feel to your photos. Take a bird’s-eye view to see how each filter would affect your photo in a single grid view, or swipe through looks to compare your options. Frame the action which helps you to crop and pinch to zoom in order to focus attention. Auto-enhance allows you to make your photos pop with balanced light and colors by tapping the wand.

Heres a video description of how the Photo filter works... Enjoy...


if you have twitter already just update or download on the Google Play Store or Apple App Store.

dont forget to follow us on twitter for more updates... 


Sunday, December 9, 2012

Why Windows 8 Boots so Fast?


You know that Windows 8 booting speed is fast, but have you ever considered “why it is so” and how Microsoft did it to give you the great PC experience ever. Microsoft engineers have done a great job on reducing the Windows booting time at its lowest by making several transitions and that’s why you can get into the Windows 8 and ready to use it in as less as 7 seconds.

Windows 8 can pass the power on self test (POST) screen, render BIOS to Windows and loads graphical window while keeping you at the manufacturer start screen or logo. Once you get into Windows, can choose the desired OS to start with if the system have dual copy of Windows or configure other settings from the same menu like system recovery options, command prompt, system image recovery etc.

Windows 8 is remarkably fast, and you might have no chance to interrupt the boot. Means, you may don’t see options like ‘Press F2 for setup’ or other similar options which can be seen and used in previous versions of Windows.

Below is the comparison graph to have clear idea about how fast you can boot in Windows 8 than Windows 7.


In most modern PC’s containing Windows 8, all you can see is the manufacturer logo for a very little time and then immediately taken to the Windows 8 desktop screen without seeing any BIOS message or Windows booting screen as in its predecessors.

What methodology Microsoft engineers employed or what has been removed/added to make Windows 8 so fast? Have a look on the below facts to explore the ideas behind Windows 8 fast booting.

Why so fast?

Windows 8 booting systems were moderated and redesigned in a way that it takes minimal set of hardware resources and battery energy or power drain. As a result, minimal set of input/output requests are made to access the required boot parameters.

In traditional Windows OS i.e., Windows 7, firmware interface tends to close the entire user sessions, kernel sessions and broadcasts messages to devices, windows services, drivers, printers and running applications to close down any running handles as Windows station is shutting down. If any running applications couldn’t be turned off properly, windows forcefully closes them down after saving any unsaved data on hard drive to make sure that they were not lost.

Where as, Windows 8 turn off only the user session and keep the kernel session running in hibernate mode. Unlike full hibernation, only the exact system state and memory content is stored on disk using ‘hiberfil.sys’ system file and Windows can easily restore them and reinitialize the drivers at very next time you begin using your PC. 

Below are the graphical differentiation between normal boot and Windows 8 boot model, hope you’ll have some clear idea from it:


Though, you can take more benefits of this great boot time by adding an SSD and placing windows on it as SSD reads and access data more fast than traditional hard drives. This great improvements in Windows 8 can draw many other benefits too and make you able to keep Windows running in standby mode over a week or so without having any speed difficulties.


follow the team on twitter from more updates...


Tuesday, December 4, 2012

Google I/O 2013 set for May 15

Google is moving back to their usual May timeline for Google I/O 2013 After hosting a rather late Google I/O conference than usual towards the end of June earlier this year. May 15-17, 2013 will be the dates for the upcoming developers conference, with registration starting sometime earlier in the year.


Google confirmed the dates on their developer's twitter page, the company hasn’t mentioned any other details on what’s to come at the conference, but we’re guessing that Project Glass will make a big appearance on stage. We’ve seen it in action before at Google I/O 2012, but it’s possible that the company may announce public availability for the product, or a release date.

I/O 2012 was huge for Google. They announced Android 4.1 Jelly Bean, Nexus 7,  Nexus Q and Project Glass, updates for Google+, Google Maps, and YouTube. Hopefully we’ll see the same kind of action come this May.

Unfortunately, Google doesn't have nothing on their I/O website, we’ll just have to sit and wait for registration to open in next year.


Saturday, December 1, 2012

Google announces 10 GB file transfers in Gmail [Report]

Google Drive and Gmail have teamed up for a new project to allow their web mail service users send enormously large files across Internet. The company has declared it would allow its users to insert files of up to size 10 GB directly from Drive into their messages. This is what users have been wanting since long.


Gmail's product manager Phil Sharp writes in a blog post "Now with Drive, you can insert files up to 10GB — 400 times larger than what you can send as a traditional attachment. Also, because you’re sending a file stored in the cloud, all your recipients will have access to the same, most-up-to-date version."

To use this feature all you need to do is click on the Drive icon while you’re composing a message and proceed. Along with it, Google is also introducing some smart assistant technology that will be assigned with the task of double-checking if your recipients have access to any files you’re sending.

Wednesday, November 28, 2012

Microsoft is Working on a New Operating System Codenamed 'Windows Blue'

Microsoft is busy preparing the next-generation of Windows client, shortly after shipping Windows 8 in October. Several sources familiar with Microsoft’s plans that the company is planning to standardize on an approach, codenamed 'Windows Blue', across Windows and Windows Phone in an effort to provide more regular updates to consumers.


According to sources, the new operating system will be released in mid-2013 which will include UI changes and alterations to the entire platform and pricing. Microsoft will price its next Windows release at a low cost or even free to ensure users upgrade. Once Windows Blue is released, the Windows SDK will be updated to support the new release and Microsoft will stop accepting apps that are built specifically for Windows 8, pushing developers to create apps for Blue. Windows 8 apps will continue to run on Blue despite the planned SDK changes.You will need a genuine copy of Windows to upgrade to Windows Blue. Built-in apps and the Windows Store will cease functioning if a copy is upgraded that is pirated.

Sources tell us that Microsoft will likely keep the Windows 8 name for the foreseeable future, despite the Windows Blue update. A big part of Windows Blue is the push towards yearly updates for Microsoft’s OS. Microsoft will kick off an annual upgrade cycle for Windows that is designed to make it more competitive against rival platforms from Apple and Google.


Follow the team on twitter for more updates... 


Monday, November 26, 2012

Windows Phone 7.8 to be released on 28th November

Not that long ago, we heard that Windows Phone 7.8 had hit RTM (Release to Manufacturing) status and that it would not come with Internet Explorer 10. Microsoft has yet to reveal when Windows Phone 7.8 will make its appearance and all we know is that this update is designed for those who will be unable to update to Windows Phone 8.

Now, a new rumor claims that Windows Phone 7.8 will be released this Wednesday, November 28.


We learned that Windows Phone 7.8 had been Released to Manufacturing (RTM) and that IE10 would not be making an appearance in the update. Microsoft has yet to official reveal when Windows Phone 7.8 will be rolled out but the company has indicated that it would be released soon after the release of Windows Phone 8. 

The update will bring the new start screen with new accent colours, Bing lock screen wallpaper, and on Nokia handsets SMS drafts and the ability to keep WIFI active when the device is suspended. it also includes re-sizable tiles and the removal of the gap on the right side of the Start Screen. Microsoft hasn't been too chatty about Windows Phone 7.8, which is designed to work on phones that don't have the hardware requirements for Windows Phone 8.

We are on twitter, followers for more updates. 

Run Firefox OS on your Windows, Mac or Linux PC

Earlier this month, Mozilla announced that its mobile operating system, officially named Firefox OS, would be put into some low end smartphones starting in early 2013 in Brazil. The OS is based on HTML5, the same language used to make websites and other applications.


Now Mozilla is allowing anyone with a Windows, Linux or Mac PC to check out and even test early builds of Firefox OS. It will support everything you would expect from a smartphone, (friend dialing, spouse messaging, internet browsing, web gaming, photo taking, video watching, and music bumping!)

This download is not for the casual PC user but if you want to get an early glimpse into what Mozilla is doing to compete with iOS, Android, Windows Phone or Blackberry you can download the Firefox OS daily desktop builds right now. After that is accomplished, you will have to head over to the Gaia Hacking Wiki page for instructions on how to set up your PC to install the Firefox OS build.

Disclaimer: This OS was released for developers and still under development crashes may occur, make sure you have a Mozilla account to report bugs and errors for the better development for this OS on the desktop and various mobile platforms.

if you like this post feel free to comment and share.
don't forget to follow the team on twitter for more like this.

Sunday, November 25, 2012

Google Nexus 4 Expert Review

Introduction

Korean-based manufacturer LG is seeing itself in a very unfamiliar position in the smartphone industry. For a change, the spotlight has been directed at them of late – thanks primarily to the recent launch of its flagship device in the LG Optimus G. And with that going for them, it surely surprised many when the first rumors started coming around hinting to the notion that they would be the one to actually produce the next Google Nexus device. it’s a prized opportunity to be the one chosen by Google to come up with the next Nexus smartphone, since as we know all too well, they’re highly prized items sporting the latest and greatest with Android.


we’ve seen some fantastic smartphones come to market – with each one seemingly raising the bar. In a time when we’re presented with renowned devices such as the iPhone 5, Samsung Galaxy Note II, Nokia Lumia 920, HTC DROID DNA, and the LG Optimus G, one can only imagine the kind of star power needed by the Google Nexus 4 to stand apart from all the rest. Well, seeing that we’re given the latest flavor of Jelly Bean, combined with one unimaginable price point, it seems as though the Nexus 4 has all the correct ingredients to make a meaningful, yet highly prized smartphone in this cutthroat business.

The package contains:


  • MicroUSB cable
  • Wall charger
  • Quick Start Guide
  • Safety & Warranty Guide
  • Terms & Conditions, Return Policy, and Limited Warranty Guide

Design

The last two Nexus smartphones put out by Samsung haven’t been cutting-edge per second in the design department, but thankfully enough, LG manages to bring back a small sprinkling of premium to the beloved line. But to tell you the truth, the overall design of the Nexus 4 still doesn’t match the precision and attention to detail seen with the original Nexus One. From the front, its minimalistic and clean surface stands out most prominently, but as a whole, it looks very much like the Galaxy Nexus from last year. However, it’s in the rear that we’re most impressed with the handset, since it’s employing a cool looking pattern design very similar to what’s seen over with the “Crystal Reflection” rear casing of the Optimus G. Depending on the angle, it sparkles brilliantly with its alternating dotted patterns. Even better, the glass casing layered on top of it adds that desired level of premium to its entire construction.


The Nexus 4 comes of being super slippery in the hand – attributed to the handset’s front and rear surfaces being covered in glass. In fact, it’s so very slippery that when we place it on a surface with a slight incline, it begins to slowly slide down, and in many instances, we’re always left to remind ourselves to keep an eye on it. Additionally, it’s a magnet for all the nasty baddies out there that dirty up its beauty – like fingerprints and smudges. With the help of a cloth, though, they’re relatively gone in one quick wipe, thus, bringing it back to its pristine appearance. Compared to other recent handsets, the Nexus 4 doesn’t attempt to push its construction to the limits, which is evident by its 0.36-inch thick profile and 4.9 oz weight – making it still somewhat unwieldy to hold in the hand. Ultimately, if it weren’t for the glass casing and enchanting pattern design of the rear, this would’ve been a bland looking handset.


it doesn’t surprise us there are no capacitive buttons below the screen on this beauty, but rather, its LED pulse notification light is positioned there instead. On the opposite edge, we greeted with the usual suspect of characters – these include its earpiece, light & proximity sensors, and front-facing 1.3-megapixel camera, the latter of which can shoot video in 720p.

Checking out the items littered along its trim, which is sporting a matte soft touch coating, we find its volume control on the left edge and power button on the right. Raised slightly above the surface, they’re distinctive enough to feel out with our fingers, but even better, they exhibit good feedback when pressed.

Along the top trim, there’s the 3.5mm headset jack and noise-cancelling microphone – while on the bottom, we’re left with only the standard mic and microUSB port for charging/data/video-out connectivity. Somewhat of a bummer, the Nexus 4 forgoes using a more favorable MHL port for video-out functionality, and instead, it relies on a Slimport socket, which means you’ll need to purchase yet another proprietary adapter in order to connect it to a high-def TV. Additionally, it boasts wireless video-out functionality too, but you’ll need to have equipment that’s compatible with Miracast’s wireless display standard – again, it’s a complex process.


Flush to the glass surface of the rear, the Nexus 4 is sporting an 8-megapixel auto-focus camera with LED flash, which is capable of shooting 1080p videos. And finally, the narrow speaker grill is located towards the bottom right of the rear casing. Seeing that it’s sporting a closed design, there’s no easy access to its internal 2,100 mAh battery.


Display

The Nexus 4 comes with its 4.7-inch WXGA 768 x 1280 True HD IPS Plus display, with its above average pixel density of 318 ppi. it’s relying on good old IPS LCD technology, it delivers colors that are the most natural in tone, giving it a distinctive realistic appearance over the saturated tones put out by the rival AMOLED technology, it works rather well when it matters the most with outdoor visibility, which is attributed to its strong brightness output, decent reflection rate and wide viewing angles.

Protecting everything, its screen is soundly reinforced with Gorilla Glass 2, which is rounded around the trim to seamlessly transition and mix well with its sides. Just like on the Optimus G, it’s utilizing Zerogap technology that simply combines the LCD panel with the glass and eliminates the air gap usually found there, to make it appear closer to the surface. All in all, it’s sharp looking no doubt, but as we’ve made it transparent, it’s nothing that’s ground-breaking.


Interface:

Normally, the introduction of a new Nexus device typically signals a totally new version of Google’s Android platform, but that’s not the case here. Rather, as Google plainly says, it’s nothing more than a “new flavor” of Jelly Bean. To be specific, the Nexus 4 is rocking out to a stock Android 4.2 Jelly Bean experience, and we have to say, it’s carrying along some surprises that steers the platform’s evolution into the correct direction. At heart though, the look and feel of Android 4.2 is identical to the previous 4.1 Jelly Bean version, so many users will be familiar with the surroundings. Before we dive into the nitty-gritty part of the platform, Google has really toned things down with its UI – meaning, it’s more minimalistic and straightforward with its presentation.


it’s amazing how far the platform has come since its inception – and it obviously shows with this latest edition. As we’ve slowly seen with the last couple versions of Android, it’s moving away from the glowing TRON-appearance of Honeycomb, and to an extent, Ice Cream Sandwich as well. Hitting the mark as usual, there’s plenty of personalization found with Android 4.2 Jelly Bean, but with certain widgets, they’ll automatically resize and move to accommodate new ones being placed onto the homescreen. Also, we notice a new transition animation in play when apps are launched for the first time, or when we’re switching between them from within the recent apps tray. Certainly, these two new items don’t have a drastic effect on the operation and appearance of the platform, but nonetheless, they’re small things that are appreciated. With that out of the way, let’s take a closer look at some of the other major new features with Android 4.2 Jelly Bean.


Native widget support in the lock screen

Making things even easier, there’s now native support for certain widgets in the lock screen. Well, the limited listing includes the Calendar, Digital Clock, Gmail, Messaging, and Sound Search widgets. In order to access them, all you need to do is swipe right from the left bezel in the main lock screen – while swiping left from the right bezel gets us the camera app. No doubt, we love having access to certain things without getting into the handset, but some of the supported widgets are more practical than others.


Updated notifications panel

The notifications panel now boasts expandable, actionable notifications. Well, we’re already familiar with the expandable portion that allows us to preview things, but now we’re given different actionable options with each of them, there’s a button in the top right corner that gives us access to the usual assortment of connectivity items with the handset – like Wi-Fi, Airplane mode, Bluetooth, etc. Even better, we can modify the screen’s brightness all from this hub, so yeah, it’s a native feature that’s always welcoming.

Daydreams

Android 4.2 Jelly Bean packs the new “Daydream” feature. Essentially, it’s a screensaver that automatically activates whenever it’s docked or charging. Surely, it adds a nice visual touch to the whole charging process, but considering we rarely finding ourselves oogling over our device as it’s charging, it’s not something that we can relish over.


Functionality

Quickly looking at some of the core organizer apps on the Nexus 4, their features are customary of any other Android device out there, but their layouts are favoring the platform’s general minimalistic look. Beyond that, there isn’t anything particularly out of place, as the Calendar, Clock, and Calculator apps all function the same. Still, Google Now is present to keep up organized with our everyday affairs.


The stock Android 4.2 Jelly Bean on-screen keyboard is an exact facsimile to the previous version. Combining its spacious layout and responsiveness, we’re able to casually type at a reasonable rate with minimal accidents along the way. New to the experience is a native Swype-like feature, which allows us to glide our finger over each letter to predict our input. Yes, it works well, plus, the animation attached to it is pretty cool too.


Yet again, there’s nothing dramatically different with the Gmail and Email apps on the Nexus 4, as they employ all the usual arsenal of features we’re accustomed to experiencing. Actually, there’s one single feature found with Gmail – the ability to quickly archive things by swiping left or right in the inbox.


Processor and Memory

it’s running a quad-core 1.5GHz Qualcomm Snapdragon S4 Pro processor with the Adreno 320 GPU and 2GB of RAM. No doubt a powerful item, its presence is felt as it’s able to handle all operations with minimal fluff. However, we’re a bit surprised to see that it doesn’t match the same level of snappiness we’ve seen on the LG Optimus G, which is made stranger considering this is a stock Android experience we’re dealing with here. Regardless of that, we’re satisfied with its overall performance, despite the so-so benchmark scores, which can be due to them not being fully optimized for Android 4.2. Yet, we do come across a few pauses every now and then.
Since the concept is all too realized with many of the premier smartphones out there, the Nexus 4 doesn’t offer storage expandability via a microSD card slot. Instead, you’ll need to rely on its inept starting capacity of 8GB – while alternatively, you can choose to get with the 16GB model. Whichever you decide to go with, it’s just unfortunate that it can’t be supplemented.


Internet and Connectivity

One of the biggest surprises with the Nexus 4, has to be none other than the fact that it doesn’t support LTE. For something so grand, that’s surely a big letdown for anyone used to the comforts associated with LTE’s lightning fast data speeds. Conversely, it shouldn’t be a factor for those living in non-LTE areas, since the device is sporting HSPA+ speeds. Although it’s nowhere as fast as LTE, complex pages didn’t take an inordinate amount of time to load on the Nexus 4, and for the most part, we’re content with it. Furthermore, thanks to its powerful processor, it’s able to maintain a lovely response with Chrome’s performance – so we can’t complain about it that much, since it works well for the occasion. No, we’re not going to die because it’s lacking LTE support, especially when the web browsing experience is more than adequate to our liking.

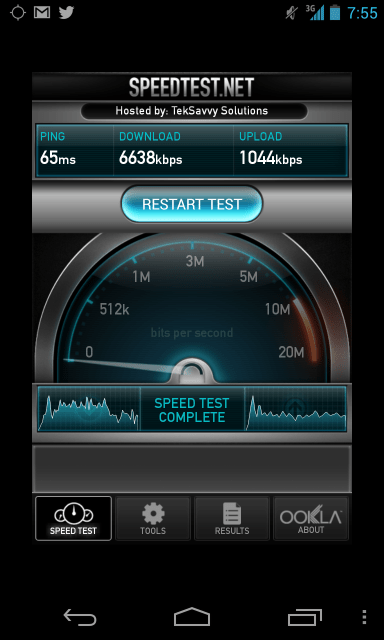
In truly showing its compatibility on a worldwide level, the Nexus 4 features penta-band HSPA+ connection – the kind that receives 42Mbps speeds. Well, in our testing, we’re able to get maximum download and upload speeds of 6.3Mbps and 1.3Mbps respectively. On top of that, it’s your typical quad-band GSM device, which merely guarantees that it’ll be compatible with a wide array of networks around the world. Lastly, it’s outfitted with the crew of connectivity features we’re normally exposed to – like aGPS, Bluetooth 4.0, 802.11 b/g/n Wi-Fi, NFC, and mobile hotspot functionality.


Camera

Another area that we see a major shakeup with the platform is the camera UI of the Nexus 4, which now sports an even more uncluttered interface – continuing the UI’s stance of being more minimalistic. Basically, the viewfinder dominates most of the interface, with the shutter key, camera settings, and shooting modes accessible towards the right edge. By default, it’s set for facial recognition to automatically focus, but of course, it can be overridden with touch focus. Sadly, there aren’t a whole lot of manual controls and shooting options, but the few that are found include HDR, changing the white balance & exposure, and picture size. As for some of its other features, it packs the same panoramic mode as before, as well as the ability to snap a photo while simultaneously shooting video. However, there’s an interesting new addition called “Photo Sphere.”


In this mode, it essentially allows us to take a full first-person perspective of our view – something similar to Street View in Google Maps. Following the blue dots that appear as we’re scanning our surrounding, the handset takes all the shots and stiches them together to produce a 360-degree rotatable view. It’s pretty neat and work rather well, though, we do notice some distortions in some cases, but for the most part, it does a seamless job. As much as we adore this feature, the finalized production is only accessible to other Android 4.2 devices. Nevertheless, it’s going to be interesting to see how Google incorporates this in the future with its ecosystem. Plainly, handset users can become real-world geographers and possibly help to expand Google’s Street View ecosystem.


For a device privileged to uphold the Nexus branding, we were expecting more from the quality of its 8-megapixel auto-focus camera. Instead, its results are nothing more than average, which doesn’t rival some of the elites. We can dream of course, but even though it is not among the best, it still produces some pleasant looking images that are acceptable. Naturally, the best results are found with images taken outdoors with plentiful lighting, as it has a good balance between details and colors – though really, details can appear muddy at times. Although it has a neutral tone with its color reproduction outdoors, it casts noticeably cooler tones indoors under artificial lighting. Rather unfortunate, it doesn’t handle low lighting situations all that well, since it’s flawed by general noise, graininess, and soft details.

Usually there isn’t a huge disparity between still and video capture quality, but with this, it’s not the case. Disappointing to say the least, we were expecting a whole lot more out of its 1080p video recording quality. Distracting us the most is the heavy presence of artifacting that’s abundant in everything, which even poses a problem while holding the handset still. Moreover, it lacks continuous auto-focus and its details are very soft to point that it doesn’t appear to be high definition quality at all. So yes, we’re extremely upset by the poor results in this category!


Multimedia

it appears as though there’s nothing anew in the Gallery app at first glance, but upon diving deeper, it’s so uplifting to find that it’s now laying claim to an extensive set of photo editing tools. In addition to some basic things like cropping and resizing, the updated gallery packs a ton of cool Instagram-ish filter effects and borders to appease our hungry need of spiffying our shots – and it’s nice that we don’t have to download a third part app for it!


Taking into account that the Nexus 4 is packing along the tried and true Google Play Music app, there’s nothing particularly new about it, seeing it’s employing the same interface as before. Still, we got to hand it to them for offering that cool 3D carousel to browse through our music collection. Audio-wise, its internal speaker is sufficient enough with its pleasant output, which is strong and distortion-free. However, its lacks any meaningful bass tones to give it that pop – ultimately making it sound a bit mute. Luckily, there are a few different equalizer settings to better fine tune its output.

As expected, the handset is excellent for watching videos – thanks to its large screen real estate, high resolution, pleasant color reproduction, and swift performance. With the latter, it’s attributed to its beefy quad-core processor of course, but beyond that, it executes flawlessly to make the experience lovable. Interestingly, it lacks support for video codecs like DivX and Xvid out of the box, but at least it has MPEG-4 and H264 support.


Mentioning it earlier, the Nexus 4 features a Slimport socket for video-out functionality. Certainly, it’s infuriating to know that they decided to go with a totally new standard with this one, as opposed to sticking it firm with some kind of MHL connection instead.


Software

Being the pure Google smartphone it is, there is no bloatware on the handset, but as usual, it’s stuffed with all the customary Google apps – like Google+, Google Maps, Movie Studio, News & Weather, Play Books, Play Movies & TV, Play Store, Google Talk, Google Wallet, and YouTube. Peering at all of them, they’re the same ones we’ve been familiar with this entire time.


Call Quality

Besides the hint of crackling heard through the speakerphone at its loudest volume setting, call quality on the Nexus 4 is excellent. Through the earpiece, its clarity is superb, as voices are natural in tone, distinctive, and distortion-free. Likewise, that’s the same quality heard on the other end of the line by our callers.
Neither dropping any of our phone calls or fluctuating severely with its connection, the Nexus 4 manages to put up a strong signal strength in the high coverage areas of the greater Philadelphia region.


Battery

Sure, we’re able to get by through a single day of normal usage with the 2,100 mAh battery of the Nexus 4, but it’s worth remembering that it’s enabled for HSPA+ only – as opposed to the battery hungry usage of LTE. Interestingly, wireless charging is supported on the Nexus 4, seeing that its adheres to the Qi wireless charging standard.


Conclusion

The Google Nexus 4 is an impressive smartphone. Sure, it may not be the best in any particular category, but it's a very well-balanced package with an incredibly powerful processor and a gorgeous IPS screen. When it comes to its design, we do appreciate some of the delicacies of its premium exterior elements, but it doesn’t really come off as something totally invigorating to cause us to drool over it. Still, we can’t help that the majority of its finer qualities are found with the pure vanilla Android experience it’s sporting. Sure, it’s not a totally new version of Android that we have here on the Nexus 4 per se, but hey, we’re not complaining about the new features found with this “new flavor” of Jelly Bean.

Secondly, I personally think the phone has more advantages than the disadvantages they use to talk about.

if you like this review, feel free to comment, share and follow us on twitter for more like this...


Enable 4G LTE On The Google Nexus 4

Reports surfaced that the Nexus 4, Google’s latest flagship Android smartphone, supports LTE via a relatively easy software hack. After testing, it turns out that’s definitely true, so I’ll show you exactly how to enable it on your device.

NB: the Nexus 4 only supports LTE on the AWS band (1700 or 2100MHz), which is currently used for LTE networks in Canada, and for some areas served by T-Mobile’s fledgling 4G network.

Step 1
Access Phone Testing Settings
Open your phone app, and type in *#*#4636#*#*, which will instantly take you to the necessary preference panel seen below.


OR 
You can also download and install the Phone Info app from Google Play here if you’d rather not have to re-enter that sequence every time you want to change these settings.

Step 2
Change Your Phone’s Cellular Network Type
Switch which networks your phone connects to under the “Preferred Network Type” drop-down menu. There are options for various combinations of CDMA, GSM, LTE and more.


Set your preferred network to “LTE only.” Using the options that auto-select between LTE, GSM and CDMA seemed to just cause the phone to default back to HSDPA+ speeds where available.


Step 3
Change Your APN Settings
Scroll down through Settings, Mobile Networks, Access Point Names and change your APN Settings.
Visit the XDA Developers forum for list of APNs settings depending on your mobile network.

Step 4
Enjoy The LTE Speed 
After you’ve changed that radio setting, your phone should disconnect from the network, and then reconnect with LTE speeds.

Here is a shoot from Speedtest.net

HSPA+


LTE


if you like this post, don't forget to share, comment and follow us on twitter for more like this...


Saturday, November 24, 2012

500 days left for Microsoft to say goodbye to Windows XP

The countdown clock has been ticking on Windows XP for a couple of years now, but the end is coming into view. There are only 500 days to go before Microsoft ends its extended support, and that means no more patches and no more security fixes. Given that XP is not exactly famous for its security, this represents a significant risk.

Once the end of that countdown is met, Windows XP will cease to receive patches and other security updates. The operating system will therefore become dangerous for consumers, and anathema to the enterprise, for whom security is paramount.

Windows XP is coming to an end, and to fully migrate its user base – which won’t happen – the market would need to shift 1 million users a day to a more modern operating system.


However, a security breach might not be the worst of it. Journalists will be only too keen to write up the first few stories about companies whose defenses are penetrated because they are still using an obsolete operating system, so the damage to their brand and reputation could be unusually large. And rather than the polite sadness that sometimes colors such stories, victims can expect a well-deserved splattering of glee.

Still, there is no pain without gain. As well as profits for law firms, the end of XP could mean big bonuses for suppliers of cyber-liability insurance. With security breaches typically costing companies thousands of dollars/pounds a time, hefty insurance premiums would increase the already-high cost of sticking with Windows XP.

follow us on twitter for more updates...


Thursday, November 22, 2012

Jolla releases new mobile OS 'Sailfish OS'

The new OS smartphones, tablets, smart TVs, automotive and other devices.
Finnish start-up firm Jolla has released the new Sailfish OS and detailed the improved multitasking features, interaction and its personalisation options.
Developed in collaboration with Sailfish, the new Sailfish Software Development Kit (SDK) and Jolla User Interface (UI) will support multiple chipset technologies.

According to Jolla, ST-Ericsson is all set to support the new Sailfish OS in its NovaThor platforms.
Jolla CEO Marc Dillon said that ST-Ericsson's NovaThor platform combined with Sailfish OS will enable vendors to bring competitive mobile products to the market. "We also target to announce other chipset provider partnerships soon," Dillon said.

Supporting smartphones, tablets, smart TVs, automotive and other device classes, the new OS will be developed through community participation.

The Sailfish SDK features Mer Core's tools, Qt Creator, Jolla UI components, Sailfish UI framework and Sailfish handset application interfaces.

The Sailfish user interface is claimed to be developed as per the latest user requirements and the UI Sailfish will offer easy multitasking.

Jolla is also planning to offer ready-made Jolla hardware to mobile network operators and also advised that firms that desire to incorporate their own technologies to the device can also deploy without sharing their elements with other vendors that operate on Sailfish.

The start was formed by a group of former Nokia employees who left the company following its decision to shift to Windows OS ditching the MeeGo operating system.

follow the team on twitter for more updates...

Tuesday, November 20, 2012

Sony releases development kit for PlayStation Mobile platform [Report]


Sony has released the first public version of software to create games for PlayStation Mobile, its gaming platform for third-party phones and tablets.


The company's gaming division said Tuesday that it is now offering a public version of its SDK (software development kit) for about US$100 in Australia, Canada, France, Germany, Italy, Japan, Spain, the U.K. and the U.S.

PlayStation Mobile is Sony's gaming platform for Android-based devices made by outside manufacturers. It is attempting to woo both hardware makers and game developers to the program, a departure from its traditional console business where it charges developers for the right to make and sell PlayStation software.

Sony will still attempt to tightly control the gaming environment in PlayStation Mobile: all software will be approved by the company, and will only run on devices it has certified. The company has also stressed that games on the platform will be largely distinct from the mainstream titles for PlayStation consoles, saying it will offer "PlayStation-like experiences" to users.

The company has made a strong effort to lure developers to the fledgling platform, setting the development cost equal to what Apple charges for building apps for iOS and offering online support for technical issues.
Sony last year launched a closed beta version of the SDK, which includes development tools and software, and has previously said the official launch would occur in November.
The company will use a pricing scheme by which developers sell their titles "wholesale" to the company, and then Sony sells the titles "retail" to end users. As a pricing example, the company said that a game priced wholesale at 70 cents will sell for about a dollar.


On the device side, PlayStation Mobile runs on Sony's Xperia phones, tablets and its Vita handheld. It is also available on a small number of phones made by Sharp as well as HTC's "One" line of smartphones.
Sony has also signed up Asus to make devices for its platform, which was previously called PlayStation Suite.

Source

follow us on twitter for more update


Nokia Releases HERE Maps App for iOS and Android

Nokia has released its new HERE Maps application for the iPhone, iPad, iPod touch and Android devices.


HERE Maps helps you feel like a local anywhere you go. See where you are, search and discover nearby places, and get a feel for the place. Collect places to remember or for later discovery. Explore new destinations and know instantly how to get there on foot, by car or on public transport. HERE Maps is based on the world-class NAVTEQ mapping data used in 90% of in-car navigation systems in the world.


Features
 • Map views – Pick the map you need from map view, live traffic view, public transport line view or satellite view
• Save map areas & wander without data coverage
• In selected countries, access community maps created and updated by users
• Maps, search and place coverage for nearly 200 countries
• Search with history and suggestions
• Share places with just a tap, including the location and how to get there, over SMS, email, or social networks
• Organize places you love into Collections
• Sign in to HERE Maps with your Nokia Account or Facebook login
• Sync with Here.net – Access your Collections anywhere
• Step-by-Step voice-guided walk navigation
• Walk navigation through pedestrian routes, parks, alleyways, and more
• Public transportation and driving directions

You can download  HERE Maps from the App Store and Google Play Store for free.

follow the team on twitter for more updates...

Sunday, November 18, 2012

Google’s Nexus 4 has been rooted just few days after released


Google’s Nexus 4 sold out around the world very quickly this week, and while there was talk of very limited supply, apparently some key people managed to get their hands on it. That’s right: the Nexus 4 has already been rooted, courtesy of HQRaja from XDA Developers.


For those who don’t know, Android rooting is the process of gaining access to the Google operating system’s subsystem. The point is usually to overcome limitations put in place by carriers and hardware manufacturers, allowing the user to alter or replace system applications and settings, run apps that require administrator-level permissions, and even completely replace the device’s operating system.

The root method for the Nexus 4 is fairly straightforward; if you have rooted an Android device before, you’ll find this an easy guide to follow. If, however, you don’t know or understand the risks of rooting your device, please don’t do it. You’re going to have to follow through and there is always a risk of bricking your device, rendering it useless.

There are now two methods you can follow, both outlined on the thread over at XDA Developers. We recommend reading over each of them and deciding which is best for you before getting started.

In addition to XDA, you can find the original method from HQRaja over on Addictive Tips. In short, all you have to do is unlock the bootloader, flash the insecure boot image provided, enable Android Debugging, plug the device into a computer via USB, and finally use ADB to push BusyBox and Chainfires SuperSU to it.

Again, this is not for everyone. Most people will not see any reason to root a device that comes with a stock version of the latest and greatest Android release, especially given that this will likely void your warranty. If, however, you want to start messing around with custom ROMs, want to make backups, and are looking to overclock your device, this is for you.

follow the team on twitter for more updates...

Saturday, November 17, 2012

Galaxy Nexus Android 4.2 Jelly Bean Official update starts rolling out

With Android 4.2 recently announced, several owners of older Google flagship handsets are curious to know when their handsets will be updated to the latest flavor of Jelly Bean. In my recent post, i gave you a complete guide on how to install it on your galaxy nexus.
This information may come as good news for those who will not want to go through the guide, as Google is now serving Android 4.2 Jelly Bean to a range of its older devices, including the Galaxy Nexus and the Nexus 7.


If you own a Galaxy Nexus, you should receive a notification for the update on your handset. In case you haven't, head over to Settings>About Phone> System Updates to get the latest version of Android.

However, not all Galaxy Nexus devices are being updated to Android 4.2 yet. There are three versions of the Galaxy Nexus smartphone: the Galaxy Nexus Takju, which is sold through the Google Play Store; an international version called the Galaxy Nexus Yakju; and the Galaxy Nexus Yakjuxx, which is sold by Samsung.

As of now, only the Galaxy Nexus Takju is receiving the Android 4.2 update. The international version, the Galaxy Nexus Yakju was the first to receive Android 4.1.2, and it should be only a matter of time before this handset receives Android 4.2.

My little advice is if you cant follow the guide to install it on your device, then wait till you get the official update on your device.

dont forget to follow me on twitter for more updates...

Wednesday, November 14, 2012

A Complete Guide to Install Official Android 4.2 Jelly Bean On Galaxy Nexus GSM

Google has officially started pushing the Android 4.2 Jelly Bean update to the Galaxy Nexus device. The update is currently being pushed to users of the US GSM/HSPA+ variant of the device but it can be installed manually to the international GSM/HSPA+ variants as well and as ever, we’ve got you covered with our detailed installation guides. So read on, and get Jelly Bean 4.2 up and running on your Galaxy Nexus in no time.


Requirements
  • GSM/HSPA+ Samsung Galaxy Nexus. Do NOT proceed if you have the CDMA variant; you WILL most likely brick your device if you do.
  • USB Cable
  • Android SDK installed on your computer for using fastboot.
  • Archive utility of your choice.
  • ClockworkMod recovery image.
  • Android 4.2 OTA Update Image.
  • Latest Android 4.1.2 Factory Image (Only if mentioned below in the ‘Preparing Your Device’ section)
Preparing Your Device
Determine whether your device is the takju, yakju or yakjuXX variant:

Launch Google Maps on your device and go to its Settings > About.
Note what it says under ‘Device’ after the term ‘samsung’. It should be takju, yakju or yakjuXX where XX is an alphanumeric combination.
Now follow these preparation instructions according to your device.

Takju On Stock ROM
Go to Settings > About phone. If it says ‘4.1.2’ under Android version, you are good to go. If it shows an earlier version, go to System updates (on the same screen), check for the latest OTA update and download and install it following the instructions you get on the phone.

You may now proceed to ‘Installing ClockworkMod recovery’ if you are on a fully stock system with stock recovery, or skip that step and go straight to ‘Installing the Update’ section if you have ClockworkMod recovery already installed.

Takju On Custom ROM & Yakju Or YakjuXX On Any ROM
If you are using a custom ROM on Takju or any stock/custom ROM on Yakju, you must first revert to the stock 4.1.2 takju firmware. Don’t worry if you have yakju, as takju firmware can be safely installed on it without any risk whatsoever.

Do note that this method will involve manually flashing the firmware images to your device and for this purpose, its bootloader must be unlocked. Unlocking the bootloader will involve a complete wipe of your device, so you should backup all your data before proceeding.

Attention yakjuXX owners: Note that you will essentially be switching your yakjuXX over to takju firmware. Since yakju firmware is compatible for manual flashing to yakjuXX devices and takju firmware is fully compatible when manually flashing to yakju devices, that should make takju firmware fully compatible with yakjuXX. However, perform this ENTIRELY at your own risk, as it also involves flashing the takju radio to yakjuXX. we will not be responsible for any damage that may be caused to your device in case anything goes wrong.

Steps in installing the latest Jelly bean 4.2 on your device
  • Unlock the bootloader of your device
(if you havent then follow this steps to unlock bootloader on you device
Download and install Android SDK
After that turn off your device and boot in bootloader mode by holding power button along with trackball.
Now go to command prompt / terminal interface on your computer and type following command:
fastboot oem unlock
Once this is done, your phone will show a screen that will prompt you regarding unlocking bootloader. Read through the instructions carefully and select “Yes – Unlock bootloader (and void your warranty) by pressing Volume Up button followed by pressing the power button.
There you go! You now have your bootloader on a stock Android device unlocked.)
  • Download the latest 4.1.2 tajku firmware here
extract its contents to a folder using your favorite archiving utility. (Depending on the application you use, extracting the contents of the downloaded tgz file may result in a tar file. Don’t fret, and simply extract the contents of the tar file.)
  • Connect your Galaxy Nexus to your computer via USB
If the required drivers aren’t already installed, they should start downloading and installing automatically. Wait till they are installed before proceeding.
  • Reboot your device into fastboot mode
if you dont know how to, follow this;
Power the device off.
Keep both the volume down and volume up buttons firmly pressed.
Press the power button without releasing the volume down and volume up buttons.
Wait till the device boots in bootloader mode (you will see a bug Start button on-screen with a lying down and opened-up Android logo), and then release the buttons. Again, if any drivers start installing on your PC, wait till they are completely installed.
  • For Takju or Yakju
Run the flash-all.bat file on Windows, or flash-all.sh on Linux/Mac.
  • For YakjuXX
Open a command prompt window, navigate to the location where you extracted the files, and enter these commands in this sequence:
fastboot flash bootloader bootloader-maguro-primelc03.img
fastboot reboot-bootloader
fastboot flash radio radio-maguro-i9250xxlf1.img
fastboot reboot-bootloader
fastboot -w update image-takju-jzo54k

Your device will boot into the stock takju Android 4.1.2 Jelly Bean firmware. Now is the time to configure your phone in the initial setup wizard. Once done with that, you should be ready to move to the next step.

  • Installing ClockworkMod Recovery
if ClockworkMod recovery has not been installed the follow this;
Download the ClockworkMod recovery image from here
Connect your phone to your computer via USB.
On your phone, go to Settings > Developer Options, enable them from the toggle button at the top, and then enable ‘Android debugging’ under the ‘Debugging’ section. If any drivers start to install on your PC, wait till they finish automatically installing.
Open a command prompt window on your computer and navigate to the location where you placed the ClockworkMod recovery image.
In the command prompt window, enter this command to reboot into bootloader mode:
adb reboot bootloader
Once the device is in bootloader mode, enter this command to flash the recovery:
fastboot flash recovery recovery-clockwork-touch-6.0.1.0-maguro.img
Now boot back into Android mode by hitting the power key once.

You should now have ClockworkMod recovery installed. All that is left now is to flash the latest 4.2 update, so let’s get on with it.

  • Installing The Update
Download the Android 4.2 Jelly Bean OTA update file from here
Connect your device to your PC. It should automatically be available in MTP mode for file transfer.
Transfer the downloaded OTA update file to your device.
Open a command prompt window and enter this command to reboot your phone into recovery:
adb reboot recovery
Once in recovery, choose ‘install zip from sdcard’ followed by ‘choose zip from sdcard’, and then select the OTA update file that you transferred to the device.
Confirm the prompt you get for installing the update, and wait patiently till it is flashed.
Once the update is completely flashed, reboot your device by selecting ‘reboot device now’.

  • Congratulations
Your Galaxy Nexus should now be running the latest official Android 4.2 Jelly Bean. 
Enjoy!


Comment below if you have any difficulties.

Follow the team on twitter for more updates...